

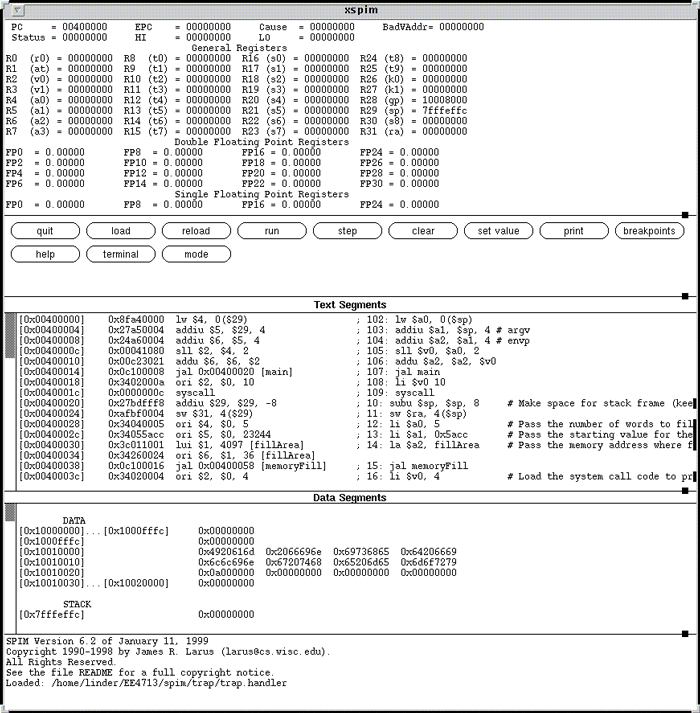
The screen capture below shows xspim on startup (before any user code is loaded). There are five windows: register display, control buttons, text segments, data segments, and messages.

The register display is automatically updated as programs execute. This is especially useful when single-stepping through code. Note, however, that when you run an assembly language program, there is some activity that takes place in the kernel after your program returns. Thus, after a run, the registers may not reflect the last values that were placed there by your code. To see how the registers are set by your code, you can stop your code at various points by single-stepping or setting breakpoints.
Note that the text segments window shows that some code has already been loaded. This is code used to handle exceptions and jump to your program. When you load your code, you will be able to see it placed just after the initial user code at the top of the text segments window. You can see that the initial user code has a "jal" to the label "main". Your code will start executing at whatever point you label as "main". The kernel section has the exception handling code.
The data segments window shows that some kernel data has already been loaded. This is string data used by the exception handling code. The other two sections in this window are for user data (called just "data") and the stack. In this simulator, the static data and heap data sections discussed in class would both appear under the data section in the data segments window.
Be sure to watch the message window when you are having any trouble because information about exceptions will appear there.
The screen capture below shows xspim after the fill.s code has been loaded. To load the code, click the "load" button, type in the path to the "fill.s" file in the dialog box, and click the "assembly file" button in the dialog box.
In the text segments window, you can see the loaded fill.s code starting at address 0x00400020. The second column in the text segment window shows the binary instruction encoding. The third column shows the assembly language representation after all pseudo instructions have been expanded. After the semicolons, the last two columns give the line number in the assembly code file and the original assembly language. Notice how the li and la instructions were expanded into actual MIPS instructions.
In the data segments window, you can see the ASCII representation of the string in the fill.s file starting at address 0x10010000.
The screen capture below shows xspim after the fill.s code has been run. To run the code, click the "run" button and then click the "ok" button on the dialog box.
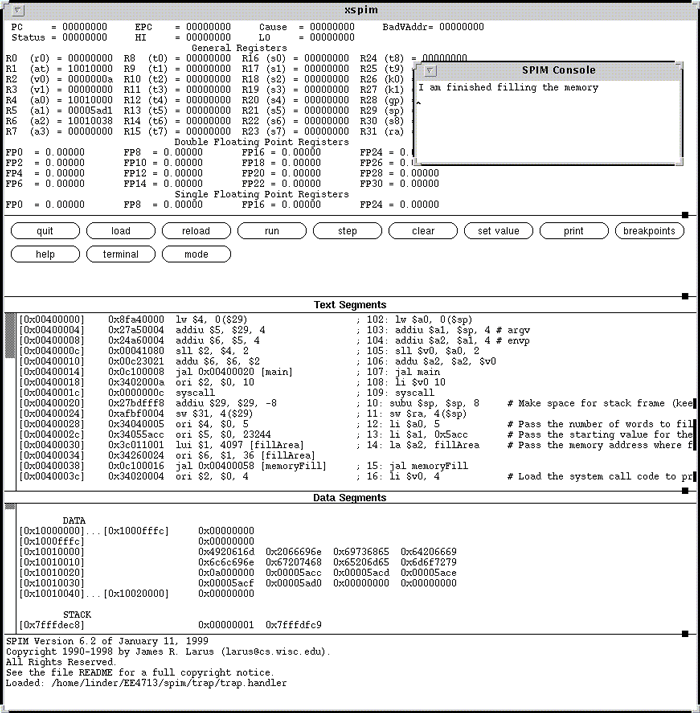
In the data segments window, you can see that the memoryFill procedure has filled in 5 words starting at 0x10010024. These are the results expected from the arguments given to the procedure. The console window has also popped up announcing that the memory fill is finished.
If you restart xspim and load fill.s again (or use the reload button), you can single step (using the step button) through the code to see the memory and register values change during execution. The screen capture below shows xspim after 17 steps.

In the text segments window, the bne instruction is highlighted. This loop decision will be executed next. In the register window, the loop control variable $a0 has been decremented from 5 to 4 and the memory fill value in $a1 has been incremented from 0x00005acc to 0x00005acd. In the data segments window, the first memory fill value of 0x00005acc has appeared at 0x10010024. As you single step, also notice how the stack pointer ($sp) and return address ($ra) registers change in value.