| TOC: Objective:
To Do:
REG1BIT
REG1BIT Simulation
REG4BIT
REG4BIT Simulation
Tips On Schematic Capture
MaxPlus under Unix
TIPS on Simulation
|
|
The objective of this lab is to become familiar with schematic capture
and simulation using the Altera Maxplus2 toolset.
To Do:
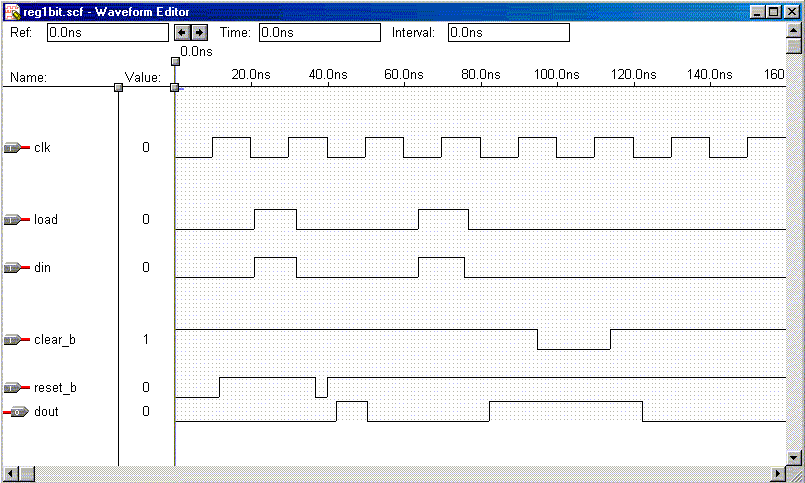
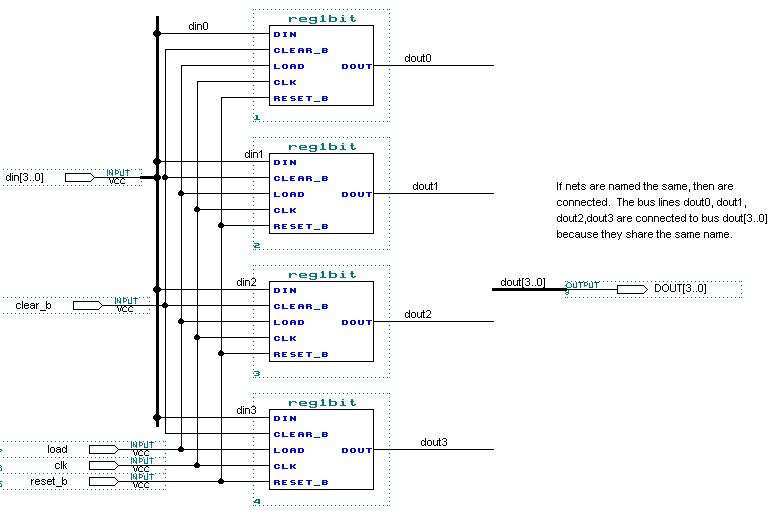
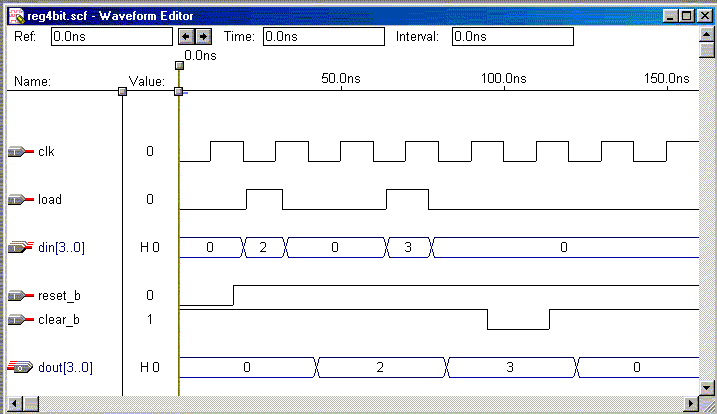
You are to create two schematics, reg1bit and reg4bit. These schematics
are shown on following page. Reg1bit implements a 1-bit register, and reg4bit uses four
copies of reg1bit to implement a 4-bit register. Duplicate both the schematics and
waveforms shown on the following pages and demonstrate your completed work to the Lab TA.
REG1BIT

REG1BIT Simulation
TOC

REG4BIT
TOC

REG4BIT Simulation
TOC

Tips On
Schematic Capture
TOC
- Use File -> New Graphic Editor File (GDF) to create a new schematic.
- Double clicking on white space in the schematic will bring up the dialog box that allows
you add new components. This lab uses components from the 'max2lib/prim' and 'max2lib/mf
'libraries. The component names used in this schematic are AND2, 21MUX (mf library), DFF,
INPUT (input pin), OUTPUT (output pin)
- To add a net (connection) between two components, click on the pin and drag to make a
connection to another pin.
- To label a pin, click on the name and type in text. To label a net, click on the net and
add the text.
- The 'compile' step is necessary before simulating your schematic. Use the File ->
Project -> Save & Compile.
- If you have multiple schematics open, to compile the current schematic, you must use
Project -> Set project to current file before using the Save & Compile command.
- To create a bus, you can use the 'line type' selector in the upper right corner of the
menu to select a wider line style, then click on the 'line' draw symbol along the left
hand side before drawing the line. The line style is ONLY for aesthetic purposes only; a
bus is identified by its NAME, not its line style. A bus name is NAME[high_index . .0],
i.e., DIN[3..0]. You add this label to a net by clicking on the net and typing the text.
To label individual nets that make up bits of the bus, use names like DIN0, DIN1, DIN2,
etc. You do NOT have to physically connect the individual nets to the bus; the names on
the nets are used to determine what nets segments are actually connected (look in the
REG4BIT schematic - I have the DIN bus physically connected to all of its individual nets,
but the DOUT bus is not physically connected - it is only connected via its naming
convention.
- The menu symbol that looks like a little 'factory' is the compile command. You have to
compile your schematic before simulation.
- To use the REG1BIT schematic in the REG4BIT schematic, you will need to create a symbol
for Reg1bit. Use the command File -> Create Default Symbol to create the symbol.
Tips On Simulation, Waveform Editing
TOC
- To create a new waveform window, use File -> New -> Waveform editor file
- To insert a node ( a waveform) , RIGHT CLICK and do Insert Node. If your waveform editor
file is named the same as the graphic file, then you can use the 'List' button to list all
available nodes and choose one.
- To change the value of portion of the waveform, click and drag on the portion of the
waveform to change - then click on either the '1' or '0' button along the left hand side
to change this portion to a 1 or 0.
- To set the END TIME of the simulation waveform, make sure the waveform window is
selected, then use File -> End Time to set the ending time.
- To insert a clock waveform, select the signal, RIGHT CLICK, and overwrite with a clock.
The clock PERIOD is determined by the 2X the grid spacing -- use Options -> Grid Size
to set the grid size. When using the OVERWRITE command to set the clock, you will be able
to specify a multiplier to multiply the clock period by.
- To change a value of bus, click and drag a portion of the waveform and click on the 'G'
menu button on the left edge (change a group value). You will be able to type in a value
for the bus.
- To execute the simulator, do File -> Project -> Save & Simulator or click on
the button with the waveform in the display. This will bring up a Simulator window. Use
the 'Open SCF' button to bring your waveform window to the front. Then click on 'Start' to
start the simulation.
- Output signals like DOUT do not have to be edited by you. You must add these nodes to
the waveform window, but their values will be updated when you run the simulator.
MaxPlus under Unix
TOC
To run maxplus under Unix do:
% swsetup altera
% max2win
This will bring up the maxplus window. The first time this is done, a font cache will
be built and this takes time. The next time you run max2win, it should not have to
build this font cache.
You should probably create separate directories for each lab.
|


