
|
|
|
|
|
|
|
|||

Preparing the simulation
If you've completed any previous VHDL lesson, you'll notice that Verilog and VHDL simulation processes are almost identical.
You can make the directory current by invoking ModelSim from the new directory or by using the File > Change Directory command from the ModelSim Main window.
- Copy the Verilog files (files with ".v" extension) from the \<install_dir>\modeltech\examples directory into the current directory.
Before you can compile a Verilog design, you need to create a design library in the new directory. If you are familiar only with interpreted Verilog simulators such as Cadence Verilog-XL, this will be a new idea for you. Since ModelSim is a compiled Verilog simulator, it requires a target design library for the compilation. ModelSim can compile both VHDL and Verilog code into the same library if desired.
vsimfor Windows - your option - from a Windows shortcut icon, from the Start menu, or from a DOS prompt:
modelsim.exeSelect "Proceed to ModelSim" if the Welcome dialog appears.
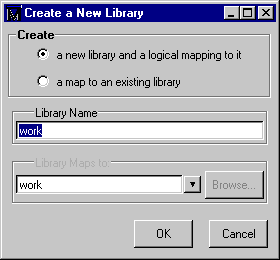
- Before you compile a source file, you'll need a design library to hold the compilation results. To create a new design library, select Design > Create a New Library in the Main window. (PROMPT: vlib work)
In the Create a New Library dialog box, select Create: a new library and a logical mapping to it. Type "work" in the Library Name field, and then select OK. This creates a subdirectory named work - your design library - within the current directory. This subdirectory contains a special file named _info.
Next, you'll compile the Verilog design.
The example design consists of two Verilog source files, each containing a unique module. The file counter.v contains a module called counter, which implements a simple 8-bit binary up-counter. The other file, tcounter.v, is a testbench module (test_counter) used to verify counter. Under simulation you will see that these two files are configured hierarchically with a single instance (instance name dut) of module counter instantiated by the testbench. You'll get a chance to look at the structure of this code later. For now, you need to compile both files into the work design library.
- Compile the counter.v, and tcounter.v files into the work library by selecting the Compile button on the toolbar:

(PROMPT: vlog counter.v tcounter.v)
This opens the Compile HDL Source Files dialog box.

Complete the compilation by selecting both files. Control+click (left mouse button) on counter.v, then tcounter.v from the file list and choose Compile, then Done.
- Start the simulator by selecting the Load Design button from the toolbar:

The Load Design dialog box comes up, as shown below.
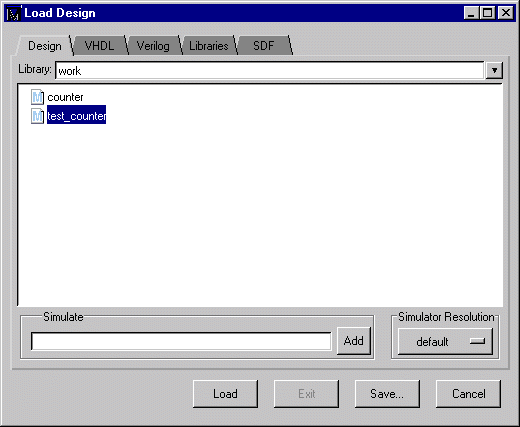
The Load Design dialog box allows you to select a design unit to simulate from the specified library. You can also select the resolution limit for the simulation. The default library is work and the default resolution is 1 ns.
- Select test_counter and click Load to accept these settings.
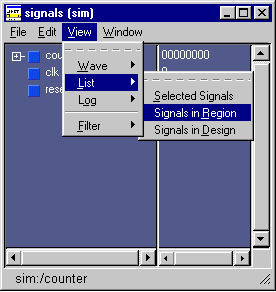
- Bring up the Signals, List and Wave windows by entering the following command at the VSIM prompt within the Main window:
view signals list wave(Main MENU: View > <window name>)
- To list the top-level signals, move the pointer to the Signals window and select View > List > Signals in Region.
(PROMPT: add list /test_counter/*)
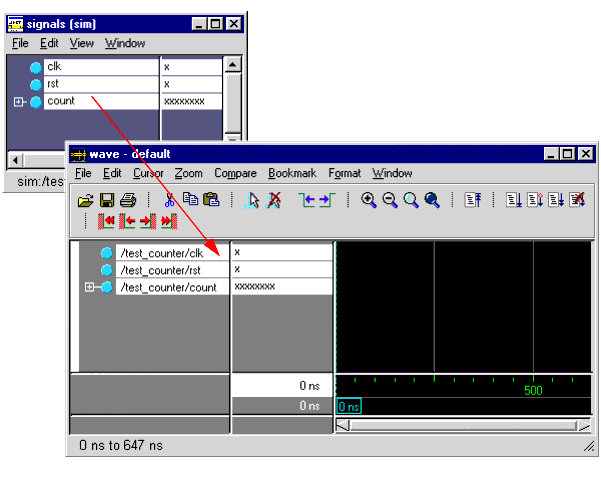
- Now let's add signals to the Wave window with ModelSim's drag and drop feature.
In the Signals window, select Edit > Select All to select the three signals. Drag the signals to either the pathname or the values pane of the Wave window.
HDL items can also be copied from one window to another (or within the Wave and List windows) with the Edit > Copy and Edit > Paste menu selections. You can also delete selected items with the Edit > Delete selection.
- Next open the Source window. Select View > Source from the Main window.
- You may have noticed when you loaded the design in Step 6 that a new pane appeared in the workspace area of the Main window.

The Structure pane shows the hierarchical structure of the design. By default, only the top level of the hierarchy is expanded. You can navigate within the hierarchy by clicking on any line with a "+" (expand) or "-" (contract) symbol. The same navigation technique works anywhere you find these symbols within ModelSim.
By clicking the "+" next to dut: counter you can see all three hierarchical levels: test_counter, counter and a function called increment. (If test_counter is not displayed you simulated counter instead of test_counter.)
- Click on Function increment and notice how other ModelSim windows are automatically updated as appropriate.
Specifically, the Source window displays the Verilog code at the hierarchical level you selected in the Structure window. The source-file name is also displayed in the Source window title bar.
Using the Structure pane in this way is analogous to scoping commands in interpreted Verilogs.
For now, make sure the test_counter module is showing in the Source window by clicking on the top line in the Structure pane.
|
Model Technology Incorporated Voice: (503) 641-1340 Fax: (503)526-5410 www.model.com sales@model.com |
|
|
|
|
|
|
|
|||
