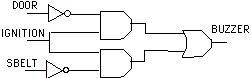
Figure 1: Logic circuit to be implemented as a HDL code
You can use any editor to create a HDL source file as long as you follow the conventions and syntax of the ABEL or VHDL language. However, the Foundation Series provides us with an easier way to create a source file, using the HDL Design Wizard.
i. Open a Project in the Foundation Project Manager
An ABEL-based design is entered using the Schematic flow mode. If you
are not in the Foundation Project Manager, open it now and create a new
project called EasyAbel. We will create the same logic function as was
done before in the Schematic Entry section (circuit of Figure
1 of the section on "Schematic Entry"). Go to the FILE -> NEW PROJECT
menu. In the pop-up window, enter the Name, Family, Part and Speed. For
flow select "Schematic".
Figure 1: Logic circuit to be implemented as a HDL code
ii. Create an ABEL Design and assign port names with the HDL Wizard
In the Foundation Project Manager, click on the HDL Editor icon or go to the APPLICATIONS ->HDL EDITOR menu. Select HDL Design Wizard. In the Design Wizard window click NEXT and go to the Design Wizard Language window. Select ABEL as the design language. Click on NEXT button which will open the Design Wizard Name window. Enter the name of your design. Lets call it EasyAbel. Names should not be larger than 8 characters. When you are using names that are longer than 8 characters the synthesizer will give an error. However, the error report does not say what went wrong!
Then click NEXT. The Design Wizard Ports window will appear showing a symbol on the left. Follow the instruction in this window. You can create here the input and output pins (ports). Use the same names as you did for the schematic of Fig. 1. Click on the NEW button and enter the Name, select as Direction Input or Output, depending on the type of port. For output pins you go to the ADVANCED button which will open the Advanced Port Setting windows. Select Combinatorial or Register, for a combinational or registered. For our simple circuit, we choose Combinatorial. When done, click on the FINISH button. The HDL Editor window will open at this point.
iii. Create the Source with the ABEL-HDL Editor
The HDL editor window will open a template which contains the Title as well as the pin declarations made in the previous step.You should verify that all the inputs and outputs are present. Next we have to add the logic description of our circuit. Logic descriptions can be entered in a variety of ways: Equations, Truth Tables, and State Description (for sequential circuits). We will be using an equation to define the logic function of Figure 1. Under the Equation section (<<add your equations here>> ) type the following equation:
BUZZER = IGNITION & (!DOOR # !SBELT);Remember that the names are case sensitive. Figure 2 shows the completed ABEL source file. You can locate the pin numbers in the ABEL code or you can specify them later in a "User Constraint file" when you compile the design (see Constraint Editor in the Implemenation Section).
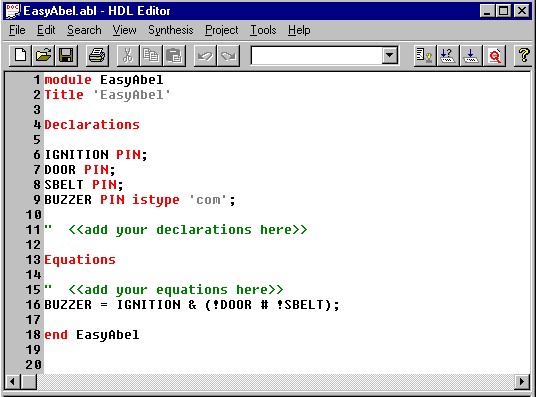
Figure 2: ABEL Editor window describing the circuit of Figure1. (Screen clip from Xilinx (TM) Foundation software)
To find out more about the ABEL syntax, click on the Language Assistant icon at the top right the toolbar, or select TOOLS -> LANGUAGE ASSISTANT. This will bring up a window with language and synthesis templates. The language templates shows basic language constructs while the synthesis templates give the code of functional blocks such as counters, multiplexers, adders, flip-flops and architectures features such as Boundary Scan and RAM blocks. Figure 3 shows the Language Assistant window.
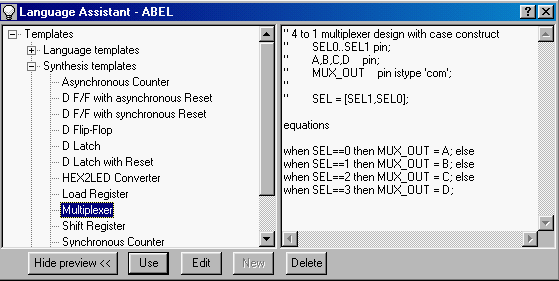
Figure 3: ABEL Language Assistant window showing the template for a
multiplexer. (Screen clip from Xilinx (TM) Foundation software)
iv. Check Syntax
Lets make sure no syntax errors have been made. Go to the SYNTHESIS -> CHECK SYNTAX menu. If successful, a pop-up window will show "Check Successful". Also, the bottom window pane in the Project Manager will display a status of the process or report any errors.
v. Save the file
Click the Floppy disk icon or go to the FILE -> SAVE to save the HDL source file. You can now exit the HDL Editor window which will bring you back to the Project Manager window.
vi. Add the design to the Project
To make the HDL source file part of the Project EasyProj, go to the DOCUMENT -> ADD menu in the Project Manager window. Display File of Type: ABEL (*.ABL). Select the EASYABEL.ABL and click OK. The easyable.abl file should now appear in the Project Directory on the Project Manager Window (Files tab).
At this point you can simulate or compile your circuit. See sections on Simulation and Implementation. If you are going to simulate the design, go to the SYNTHESIS -> SYNTHESIZE menu and then click on the SIMULATION button icon in the Project Manager window. If an error occurs, double check that the name of the ABEL file doesn't have more than 8 characters.
See also, Creating Macros with ABEL and VHDL
References:
Created by Jan Van der Spiegel;
August 26, 1997; Updated by Jan Van der Spiegel; May 16, 2000.
<jan@ee.upenn.edu>;